Using Episode Lanes in your Milkymaps
Episode Lanes provide you with a way to add information below each of the Episodes you’ve created. You can only include Lane information below an Episode, so if there isn’t one there, you cannot enter Episode Lane information.
Jump to
Adding Episode Lanes to your Milkymaps
You can add Episode Lanes to your Milkymaps below each of the Episodes you’ve created. There are no default Lanes when creating a new Milkymap, you can customize everything from scratch. To create a new Lane, you can either:
Click the ‘+ Add Lane’ button in the top right-hand corner of your Milkymap

Or use the sidebar on the left side of your Milkymap and click the + there.
This will open up an ‘Add Lane’ window, in which you can select the Lane Type you’d like to incorporate into your Milkymap.
Click the Lane Type you’d like to add, this will create a new field or multiple new fields (depending on the Episodes you’ve added) for you to add information into.
Episode Lane Types
Milkymap enables you to add 10 types of Episode Lanes to your Milkymaps, allowing you to add information below all of the Episodes you’ve created.
Touchpoints - Touchpoints can only be added through Lanes, not through Widgets, as they contain information that belongs within an Episode. Touchpoints are the moments within a Customer Journey that Episodes consist of. If an Episode is the chapter of a Milkymap, Touchpoints are all the steps or moments that happen within that particular chapter.
Text - A Text Lane allows you to add text fields to your Milkymaps, which can be used for many different types of information. In this article, you can read more about applying Text Lanes to your Milkymaps.
Media - Media Lane fields are used to add Images and Video previews and links below each of your Episodes. This is therefore more specific Media, as it doesn’t have to connect to the overall Milkymap, but to Episodes within. Find out more information about Media Options within Milkymap here.
Emotions: Emotion Blocks and Emotion Curves - Customer Experience isn’t complete without zooming in on the Emotions customers are experiencing throughout a Customer Journey. You can add Emotions in two different ways: using Emotion Blocks and one or multiple Emotion Curves. Emotion Curves can only be included by using Lanes, as they connect Emotions throughout the different Episodes.
Documents - Use Documents through an Episode Lane to add important files related to this chapter in the Customer Journey. These files allow you to organize Customer Experience efforts related to that step in the journey. Need more information to include Documents in your Milkymaps? Use this article.
KPIs - A KPI Lane is great for adding NPS, CES, and CSAT scores that belong within an Episode. With a KPI Lane, you can track and monitor the performance within that Episode. Using KPIs to monitor performance will help you improve your Customer Experience over time.
Icons - In an Icon Lane, you can incorporate Icons in a more specific way than by using Icon Widgets. If you discuss the meaning of certain Icons, you can use Icons for collaboration. They can also help you organize your Milkymaps or to highlight specific information. Find out more about Icons here.
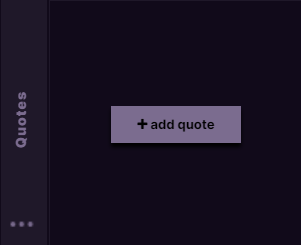
Quotes - Add statements made by customers to your Milkymaps using Quotes. In a Quotes Lane, add information regarding an Episode within your Milkymap.
Dimensions - Dimensions are set up by your Galaxy account admin and are available in three types: Brands, Customer Segments, and Products. Click here to find out more about incorporating Dimensions into your Milkymaps.
Labeling Episode Lanes
You can add Episode Labels to each Episode Lane Type, with the exception of the Touchpoint Lane. They can be used for different purposes, like highlighting a specific Lane, providing more context, or specifying the objective of including that Lane. Here is how you add Labels to your Lane:
Press the three dots in the sidebar on the left side of your Milkymap. They will be below the name of that Lane Type, in this example a Quote Lane.

Clicking the three dots will open a dropdown menu. In this dropdown menu, select ‘Add Label’ by clicking it.
This will open up an ‘Edit Label’ window
Read more about Labels in this article.
Organizing, Duplicating & Deleting Episode Lanes
Change the order of the Lanes you’ve created the way you like, create another Lane of the same Lane Type, or get rid of a Lane that is no longer relevant for a Milkymap.
Organizing Lanes
The order of Lanes can be changed from top to bottom, but all Lanes will remain below your Episodes. To reorganize your Lanes:
Click and hold the Lane Type field in the sidebar on the left side of your Milkymap
Drag the Lane to the desired location.
You can not change the order of information within your Lanes by dragging the Lane fields. As this information is connected to your Episodes, you need to reorganize your Episodes.
Duplicating Lanes
Press the three dots in the sidebar on the left side of your Milkymap. They will be below the name of that Lane Type.
Click ‘Duplicate’ in this dropdown menu to create another Lane of the same type.
Deleting Lanes
Select the Lane you’d like to delete. Use the sidebar on the left side of your Milkymap, and press the three dots in the Lane you’d like to delete
Press ‘Delete’ in the dropdown menu that opens up.
This will remove the Lane from your Milkymap