Using Improvements and Actions
Through Action Control, you can add Improvements and Actions at every level of your Milkymaps. By adding Improvements and Actions, your team or organisation can use improvement ideas to generate a positive impact for your customers. In order to add Actions, you’ll first need to create an Improvement.
Because of customizable Object Names, some of the terminology in this article might be different from your account.
Jump to
Creating Improvements
Improvements can be added to your Milkymap account in two different places: through Action Control and at different levels of your Milkymaps.
Through the Action Control menu
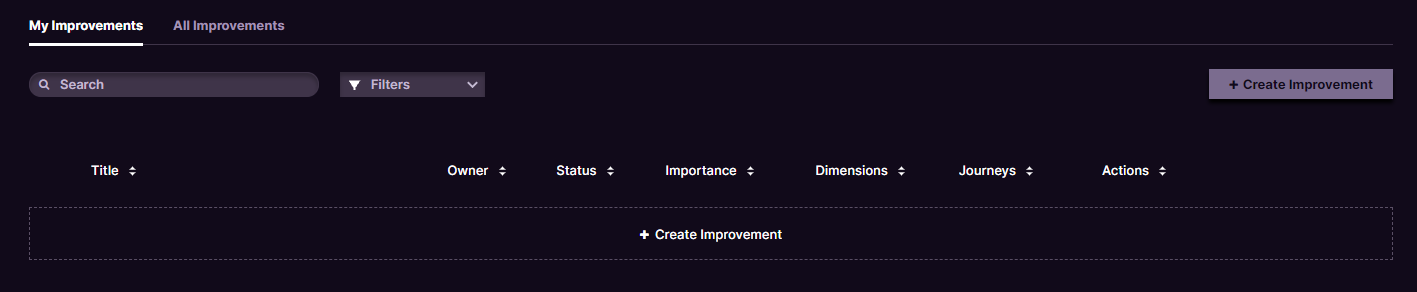
Use the top navigation menu to go to ‘Action Control’
Press ‘+ Create Improvement’ either in the right-hand corner or below your list of Improvements.
Through your Milkymaps
Either create a new Milkymap or open an existing Milkymap.
Add a new Widget at the top of your Milkymap
Select Action Control as your Widget type, adding an ‘+ Add Improvement’ button in the Widget.
ORAdd a new Lane to your Milkymap by pressing the ‘+' at the left side menu of your Milkymap to add an Episode Lane. To add a Touchpoint Lane, use the Episode header to enter the Episode that contains the Touchpoints where you’d like to add a content Lane.
Select Action Control as your Lane type. This will make an ‘+ Add Improvement’ button appear in your Lane.
Simply press the ‘+ Add Improvement’ button in your Widget or Lane, to open the Action Control Window.
In the Action Control Window, press ‘+ Create Improvement’ in the top middle of the window, or use the same button below your list of Improvements.
To make your Improvements appear in your Milkymaps, please view the next step. With just the press of a button, you can make Improvements visible in different locations in your Milkymaps.
Making Improvements Visible in Milkymaps
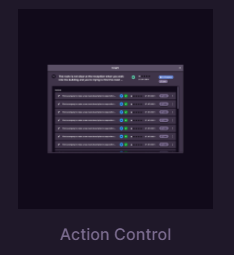
By pressing ‘+ Add Improvement’ in either a Widget, Episode Lane or Touchpoint Lane, you open an Action Control window. In this window, you can view Improvements under both ‘My Improvements’ and ‘All Improvements’.
To add the Improvement to either the Widget, Episode or Touchpoint through which you accessed Action Control, simply press the ‘Add’ button in your list of Improvements.

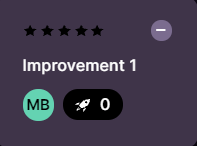
This will make it appear in the Widget or Lane in which you’ve added it, using a little summary of the information you’ve added to your Improvement. It shows the importance, status, title of the Improvement, owner and the number of Actions that are connected to this Improvement.
Improvement Information
After pressing the ‘Create Improvement’ button in Action Control or through an Action Control Widget or Lane, you can add a new Improvement.
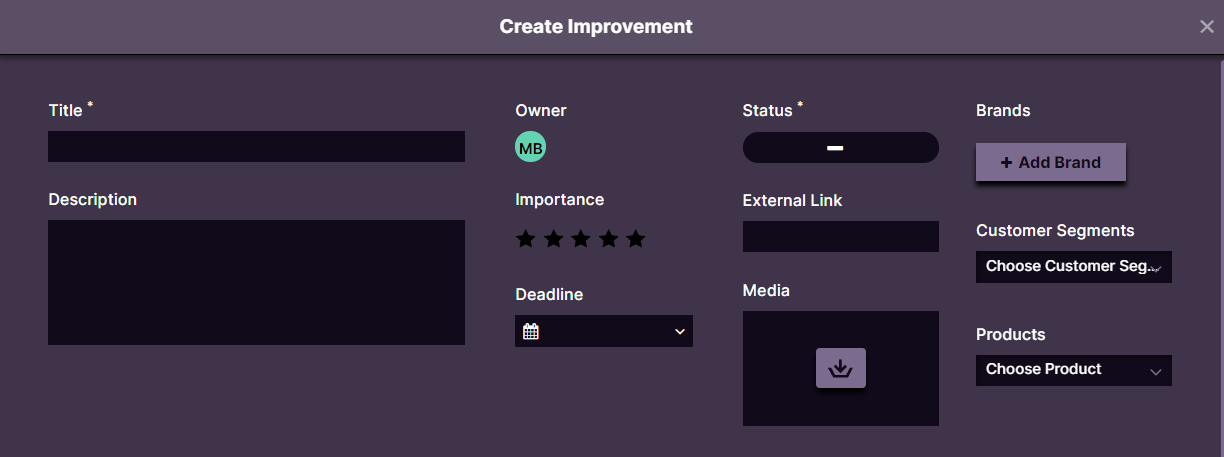
Title* - Add a clear title to your Improvement here. Try to make sure it’s something that is easily recognizable and understandable for yourself and other users. This is a mandatory field.
Description - Use this field to add further details regarding this Improvement. For instance how you gained this Improvement idea, how it impacts customers or which departments it involves.
Owner - The owner of the Improvement will be the person that created it by default. You can however change the owner of the Improvement to any user, viewer or admin in your account.
Importance - Indicate how important this Improvement is using stars.
Deadline - Select a date here to set a deadline for this particular Improvement.
Status* - You can select one of three options here: To Do, In Progress and Done. This is also a mandatory field.
External link - Use this field to add a link to this Improvement. You can add a link to the research results that made you gain this Improvement, or to a project management tool for example.
Media - Use this field to add either an image or a video to this Improvement.
Brands - Add this Dimension to your Improvement to show which Brand or Brands it influences.
Customer Segments - Add relevant Customer Segments through this Dimension.
Products - Use this field to add relevant Products to your Improvements.
The last three fields are Dimensions, meaning they are controlled by the admin or admins of your Galaxy account.
After adding information to your Improvement, you have two save options. To choose either of these, please provide at least the two mandatory fields: the Title and the Status.
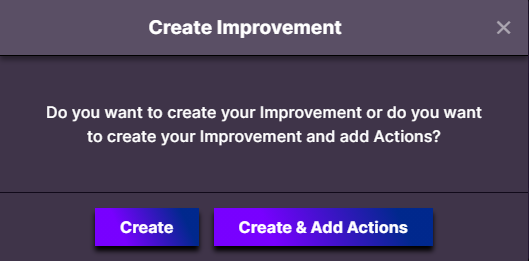
Either save your Improvement and move on to another part of the platform by pressing ‘Create’, or press ‘Create & Add Actions’ to save your Improvement and immediately continue to add one or more Actions.
Creating Actions
After saving an Improvement, you have the option to add one or more Actions.
Go to an Improvement
Press ‘Create Action’. You can do this in an Action Control window at different levels of your Milkymap: Widget, Episode Lane, and Touchpoint Lane, as well as the Action Control menu.
This will open up a window in which you can create your Action.

You can only add an Action to an Improvement. Actions can never be created without a connection to an Improvement.
Action Information
After opening the window to create an Action, you can add information through multiple different fields.
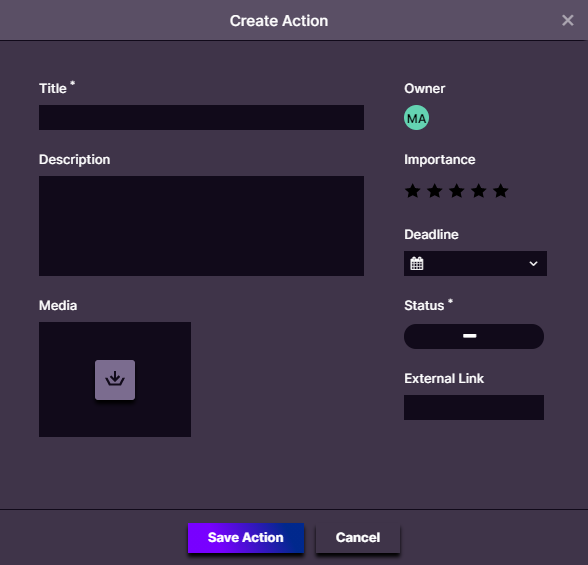
Title* - Similarly to when creating an Improvement, add a clear and comprehensive Title here.
Description - Use this field to add any kind of necessary information to explain this Action. Make sure it’s clearly actionable for other users in your account.
Media - Use this field to add either an image or a video that supports this Action.
Owner - Similarly to when creating the Improvement, the default is set to you, as the person creating this Action. You can use the dropdown menu however, to select any other person in your account to transfer ownership too.
Importance - Indicate the importance of this Action, ranging from 1-5 stars.
Deadline - If you’d like to set a completion date for this Action, use this field to select a date.
Status* - Choose from one of three options: To Do, In Progress, and Done.
External Link - Especially for Actions, it can be useful to link to a project, project management tool, calendar item or another option to ensure this Action will be completed.
After adding at least the two mandatory fields, simply press ‘Save Action’.
Custom Names
Galaxy account admins can rename both ‘Improvements’ and ‘Actions’ by going to ‘Object Names’ under ‘Galaxy Admin’ in the top menu bar.
Simply select a singular and a plural for the word you’d like to use in your organisation and press ‘Save’.
Please be reminded that changes will affect all the locations where these words have been used throughout the entire platform. We’d strongly advise selecting a name and keeping it the same for a longer period of time, to not confuse others in your organisation. Read more about Object Names here.