Using the Action Control menu
The Action Control Menu is the location for you to control your Improvements and Actions. This article explains all the options that are available in this section of the Galaxy platform. If you want to learn more about adding and creating Improvements and Actions, go to this article.
Jump to
My Improvements and All Improvements
In the Action Control menu, you have an overview of all Improvements created. They are split into two lists on two different tabs: ‘My Improvements’ and ‘All Improvements’.
My Improvements - In this tab, you can view all Improvements that you are the owner of. This can either be Improvements you’ve created yourself or Improvements that have been created by others but you have been made the owner of.
All Improvements - Under all Improvements, you can view the complete list of Improvements that are available in your organisation. This tab also includes all of the Improvements you can find under ‘My Improvements’.
Information in this Overview
In addition to the two tabs, you have a number of different types of options to navigate your Improvements and view information.
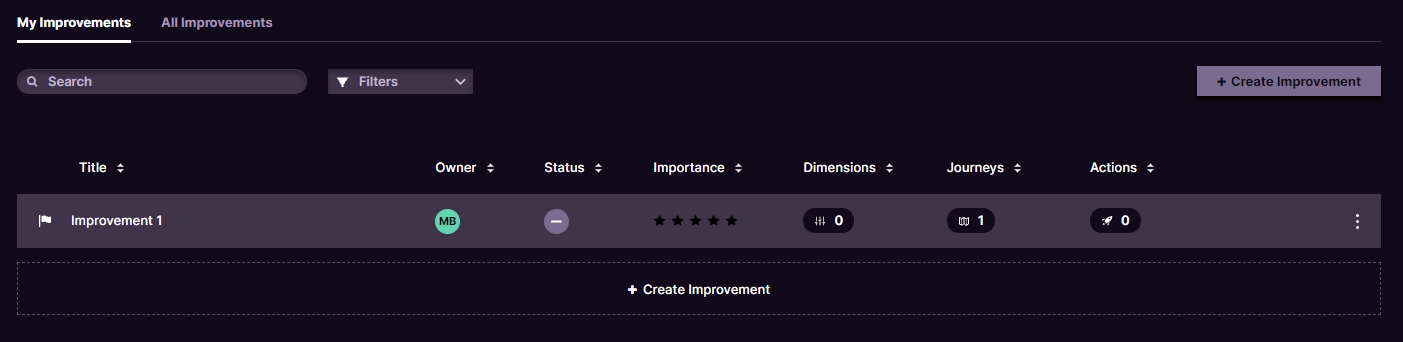
Create Improvement - Read more about adding and creating Improvements in this article. The button is always visible on the top right and also below your list of Improvements.
Search - Use this function to find a particular Improvement
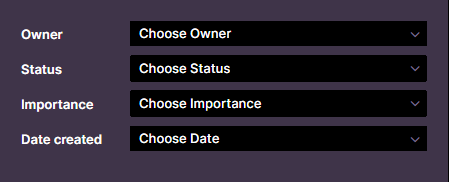
Filters - Filter options will allow you to navigate through your list of Improvements more quickly. You have multiple filter options; Owner, Status, Importance and Date of Creation.
In addition to options that will help you navigate the complete overview of Improvements, you also have the Improvements themselves.

On the left-hand side, you have the Improvement icon and the Title of the Improvement. The first bubble contains the Owner of this Improvement, with either their initials displayed or a profile picture if they uploaded one. The second bubble represents the Status of that Improvement and represents either To Do, In Progress or Done. The stars indicate the importance of this Improvement, ranging from 0-5. The next three capsule shapes count the number of connected Dimensions, Milkymaps (or Customer Journeys) and the number of Actions for this Improvement.
The Filter menu
On the left-hand side of the Action Control menu, you have a filter menu. In this filter menu, you can filter your Improvements based on a few different criteria. All three criteria consist of dropdown menus.
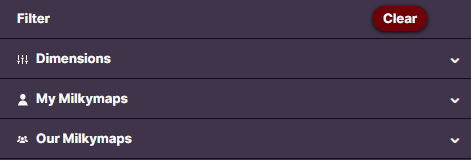
Dimensions - Expand the list by either pressing the Dimensions bar or You can either select all Brands, Customer Segments or Products by clicking the selection button on the left side of it. If you want to filter based on a specific Dimension, like one of your Brands, simply use the arrow on the right to expand the full list. Then press the selection button on the left side to filter based on this particular Dimension.
My Milkymaps and Our Milkymaps - The process is the same for Milkymaps, whether these are unpublished maps you own under ‘My Milkymaps’ or Milkymaps published by either you or other users in your account under ‘Our Milkymaps’.
Simply expand the list by pressing the bar labelled ‘My Milkymaps’ or ‘Our Milkymaps’, or use the small arrow on the right. This will show the titles of all of your Milkymaps, if you expand further it will display all Episodes and one step further will display all Touchpoints within all of these Episodes. By using this filtering option, you can view Improvements and the way they are connected to the Milkymaps in your organisation.
If you want to remove your filters, simply use the ‘Clear’ button at the top of the filter menu.
