Importing & Exporting Milkymaps
Milkymap allows you to import and export files. Importing Milkymaps can help you visualize faster and easier and in a more uniform way. You can export your Milkymap to have an offline copy that can be shared with anybody.
Jump to
Importing Milkymaps
By importing a Milkymap you can speed up your visualization process. It allows you to work on a Milkymap another user has created as a draft, or it can be used as an example Milkymap or standard in your organisation. You could even use it as a type of template, by adding all required fields
In the top navigation bar, go to ‘Milkymaps’ and select the viewing tab ‘My Milkymaps’
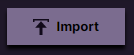
Press the ‘Import’ button in the top right-hand corner
You can either drag & drop your file, or browse your files.
You can currently only import Milkymap files (.milkymap). If you want to work on a draft someone in your organisation has created or use a demo map as an example, make sure a Milkymap file has been shared with you.
Exporting your Milkymap
If you want to share your Milkymaps with people that aren’t users in your organisation’s Milkymap account, you can export them first. Exporting will allow you to share your work with anybody through an offline copy.
Milkymap has a few other options to share with people that are users in your organisation’s account, allowing for easier collaboration. Find more information about Sharing Milkymaps here.
Press the export icon in the top menu bar.

This will open up the Export window.
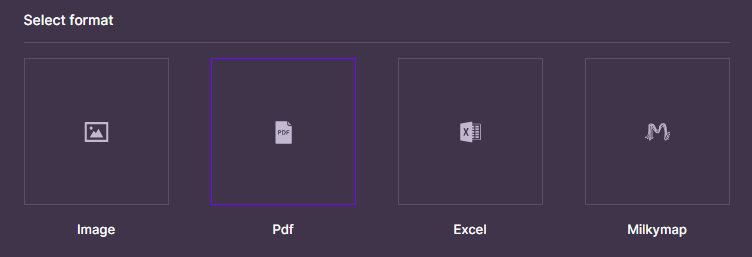
The pdf export is highlighted as the default, but you can easily switch to another option by pressing it. The selected option will always be highlighted with a purple border.
Selecting and Previewing Your Export
For the image (.png) and PDF export, users can first select the content they’d like to include in their export and preview what it looks like.
The selection and preview options are only available for the image (.png) and PDF export. The export options for Excel and a Milkymap file will automatically include all content.
Selecting Content for the Export
In the export window once either the image (.png) of PDF export format has been selected, you’ll automatically see options to select content. You can choose to either include or include different levels and types of content in your files. Selecting content will be different for every map, but can be divided into a few options:
Selecting a Range
In the range you can select or deselect different levels of content in your Customer Journey Map; overall Journey level information, Episode level information and Touchpoint level information.
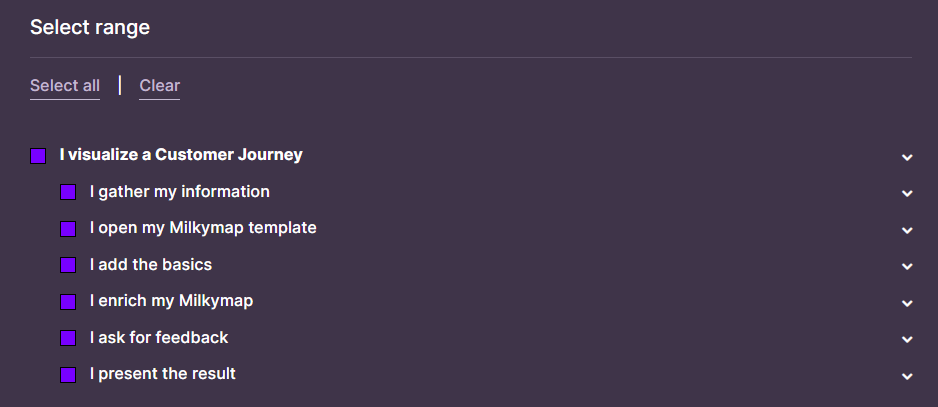
In this example, you can see that by default, all content in a Milkymap is selected for export. All content levels where the checkbox is purple are actively selected. If you want to clear your current selection, you can press ‘Clear’ at the top, under Select range. If you want to reselect all content quickly, use ‘Select all’.
The first item in the list is the title of your Milkymap, selecting this checkbox will include all Widgets and overall Journey level information in your export.
All items listed below are the titles of your Episodes. This will select all Episode descriptions, titles and media, as well as all Episode Lanes. Episode Lanes can later be deselected under ‘Select content’, but more about that later in this article.
By using the arrows on the right you can expand the Episodes to reveal the Touchpoints underneath, allowing you to either select or deselect those.
Select Content
In the ‘Select Content’ section you can decide which content that has been added to different levels of your Milkymap will be included in your export.
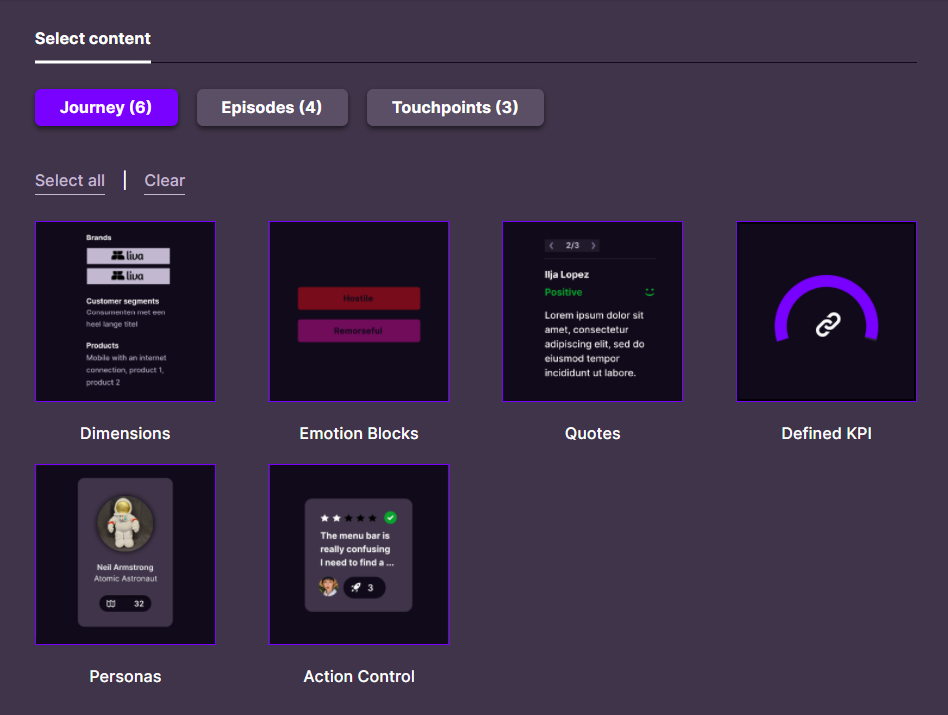
In the ‘Select content’ section, you will see all content types that have been added at a particular level of a Milkymap. The default option is to have everything selected, but you can deselect a content type by pressing it. The purple border will disappear, indicating it will not be included in your export. Here you can also use the ‘Clear’ and ‘Select all’ to make selecting content easier.
Please note that these are all the content types; so either Widgets or Lanes at a particular level. If you have added multiple Widgets or Lanes of the same type, deselecting it will mean excluding all of this type of content. For example: if you have two KPI Widgets at a Journey level, deselecting KPIs here will remove both of them from your export.
Press either ‘Journey’, ‘Episode’ or ‘Touchpoint’ at the top to select the level where you’d like to include or exclude content. The level that is highlighted in blue is selected, so in the example above the Journey level containing all of your Widgets.
Export Templates
The platform also offers two export templates for users to apply to their Milkymaps. These offer a shortcut for a particular selection.
Journey + Emotion Curve
This template will create an export including: all Journey level information, so the description, media, settings and all Widgets. It will also include the description, title and media of all Episodes and every emotioncurve within the Milkymap.Journey + Touchpoints
This will export all Journey level information, so description, media, settings and all Widgets you’ve added. It will additionally include the Episode title, description and media, as well as an overview of all Touchpoints within this particular Customer Journey
Previewing the Export
After you’ve selected all the content you’d like to export at different levels, you can preview if the selection is telling the appropriate story for the audience you’d like to share it with.
In order to preview your export, press ‘Preview & Export’. This will open a pop up where you can view all of your selected content the way it will look when you export it.
Export Options
There are a few different ways to export your Milkymaps available on the platform:
Excel file - An Excel file export can be useful when you want to create a mostly textual overview of your Milkymap. This will allow you to edit lists of information, it will provide you with a list of all touchpoints in your Milkymap and which Episodes they belong to.
Milkymap file (.milkymap) - Exporting a Milkymap this way will allow other users to import it into the platform and can therefore be used as a draft or an example Milkymap. Milkymap files can not be viewed outside the platform, so exporting them using this method means someone else should be importing the map.
The last two export options
PDF file, with or without an emotion curve - A PDF file can be used in presentations, is an easily printable format and can be quickly (re)viewed by others. Exporting to pdf will create a zip file containing one or multiple sections of your selected content. This will allow you to easily use it in presentations, as hand outs or even for posters during a workshop.
If you want to adjust your PDF even further before printing it, check out this helpful Adobe article.
Image file (.png) - By exporting your map as an image, it can be added to presentations, or viewed by others easily. All of your selected content will end up in the same .png file.
If you want to view examples of how these different Export Options look, please view this Export Examples article.