Viewing Different Milkymaps in Your Account
You can view Milkymaps in the platform under the default views ‘My Milkymaps’ and ‘Our Milkymaps’. Depending on whether or not you’ve published your Milkymaps, they will be visible for others to see. There’s also the option to create custom views, to more easily find Milkymaps that match specific filter criteria.
Jump to
Default Views - My Milkymaps and Our Milkymaps
In every account, there are two default views which can not be removed, ‘My Milkymaps’ and ‘Our Milkymaps’. On the ‘My Milkymaps’ page, you can see all Milkymaps you’ve created that you haven’t published yet. The ‘My Milkymaps’ tab is therefore similar to a draft section, containing Milkymaps that can’t be viewed by other users.
If you want other users to view your Milkymaps, you will have to publish them first. This will ensure the Milkymap ends up in the ‘Our Milkymaps’ tab, where you can find all published Milkymaps in an account.

Navigating Viewing Tabs
In order to switch between your different viewing tabs, whether default or custom, you’ll first need to access the location in the platform where you can find your views.
How to get to your Viewing Tabs:
Use the top navigation bar and press ‘Milkymaps’
The default tab on this page is ‘My Milkymaps’, but you can switch the tab your viewing or change your default to another viewing tab.
Switching to another Viewing Tab
The view tab that’s selected is underlined and the text will be white. In order to view a different tab:
Simply press the title of another view to switch to that viewing tab.
Making another Viewing Tab your default
You can choose to switch ‘My Milkymaps’ to another default viewing tab, meaning it will be the first view you enter in the platform. In order to do so:
Press the three dots on the right
A dropdown will open, click ‘Make Default’ here.
Personal New Viewing Tabs
In addition to the two views that are available for everyone in every account, you can create an unlimited number of views just for you.
Creating a Personal Viewing Tab
Creating a new, personal viewing tab is simple and can be done with just a few clicks. First select whether you want to start from ‘My Milkymaps’ containing unpublished maps you own, or from ‘Our Milkymaps, the complete overview of all published Milkymaps in your organisation’s account.
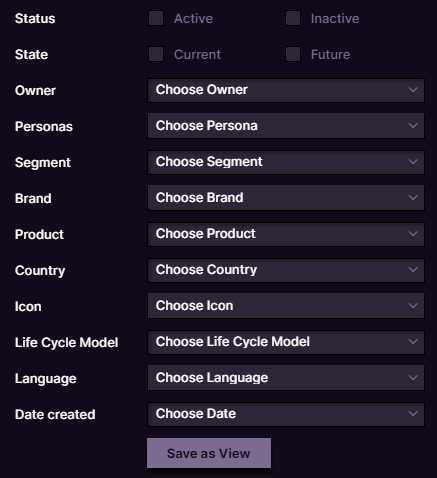
Now you have the opportunity to either use the search field by entering a search query, or the filters to add as many criteria as you like. Find more information about the available filters here.

After you’re satisfied with your selection of Milkymaps based on your search and/or selected filters, complete the following steps to save your view:
Press the Filters to open the dropdown menu
Below all filtering options, you will see a ‘Save as View’ button you’ll need to press.

This will create a new viewing tab, based on all filtering and search criteria active when you created this view. If new Milkymaps are created or published in your organisation’s account that match your viewing tab criteria, they’ll automatically be visible there.
Changing the title of a Personal Viewing Tab
After you’ve saved a new view, it will appear with an automatically generated, numbered title. To make it easier to keep track of your different views, you can change the title to be more descriptive. In order to do so:
Select the personal view you’d like to rename. The text will be white and the title underlined once it has been selected.

Press the three dots on the right side, next to the title of the selected view.
Click ‘Edit Label’ in the dropdown
In the field that opens, enter the new desired title
Press the purple tickbox to save this new title
Deleting Viewing Tabs
If you want to delete a personal viewing tab because you no longer need it or because you have created an updated version for example, you can use the following steps:
Select the viewing tab you’d like to delete
Press the three dots on the right side of the title to open up the dropdown menu
Select ‘Remove’ to delete the view. Please note that deleting a viewing tab can not be undone.
The default ‘My Milkymaps’ and ‘Our Milkymaps’ views can not be deleted from your account or renamed.
Filtering and Ordering Milkymaps
Within every view, default or personal, you can Filter and Order Milkymaps. Use the bar below the top navigation menu to do this.

Filter Options
You can combine multiple filters at the same time to achieve your desired selection of Milkymaps.
Status - The first filter can help you find Milkymaps that are either active or inactive. This can be a helpful filter to find Milkymaps that can or can not be edited and Milkymaps that are finished (for now) or not yet.
State - Find Milkymaps that either depict the current or the future state of a Customer Journey
Owner - Filter Milkymaps based on who is the primary owner of that Milkymap.
Personas - Filter Milkymaps based on a Persona that is used in a Widget in Milkymaps. You can only filter based on either your ‘My Personas’ or Personas that are public in the account - ‘Our Personas’.
Dimensions - Customer Segments, Brands, Products, and Countries - You can filter Milkymap in your organisation’s account based on what Dimensions have been selected in one or multiple Dimensions Widgets.
Icon - Filter based on the Icons used in a Icon Widget
Life Cycle Model - Filter Milkymaps that are linked to a particular Life Cycle Model. This filter works based on the connection in the Milkymap settings, no Touchpoints need to be linked to Contact Reasons (yet).
Language - Find Milkymaps that are in a particular language, based on the settings of that particular Milkymap.
Date Created - Filter based on when a particular Milkymap was created. The options are: today, yesterday, in the last 7 days, the last 15 days and the last 30 days.
Order Options
Title
Owner
Last Update
State
Customer Segment
Brand
Product